At Beanbag, we’ve been using Freshdesk to handle customer support for Review Board, Power Pack, and RBCommons.
We’ve also been using PagerDuty to inform us on any critical events, such as servers going down, memory/CPU load, or security updates we need to apply to our servers.
Our customers’ problems are just as important to us as our servers’ problems, but we were lacking a great way to really get our attention when our customers needed it most. After we started using PagerDuty, the solution became obvious: Integrate PagerDuty with Freshdesk! But how? Neither side had any native integration with the other.
Enter Freshdesk webhooks
Freshdesk’s webhooks support is pretty awesome. Not only can you set them up for any custom condition you like, but payload they send is completely customizable, allowing you to easily construct an API request to another service – like PagerDuty!
This is super useful. It means you won’t need any sort of proxy service or custom script to be set up on your server. All you need are your Freshdesk and PagerDuty accounts.
Deciding on your setup
There are probably many ways you can configure these two to talk, and we played with a couple configurations. Here are the general rules we settled on:
- Only integrate PagerDuty for paying customers (with whom we have support contracts). We don’t want alerts from random people e-mailing us.
- When a paying customer open new tickets or reply to existing tickets, assign them to a “Premium Support” group, and create an alert in PagerDuty.
- When an agent replies or marks a ticket in “Premium Support” as resolved, resolve the alert in PagerDuty.
We always resolve the alert instead of acknowledging it, in order to prevent PagerDuty from auto-unacknowledging a period of time after the agent replies. When the customer replies, it will just reuse the same alert ID, instead of creating new alerts.
Also note that we’re setting things up to alert all of our support staff (all two of us founders) on any important tickets. You may wish to adjust these rules to do something a bit more fine-grained.
Okay, let’s get this set up.
Setting up PagerDuty
We’re going to create a custom Service in PagerDuty. First, log into PagerDuty and click “Escalation Policies” at the top. Then click the New Escalation Policy button.
Name this policy something like “Premium Support Tickets,” and assign your agents.
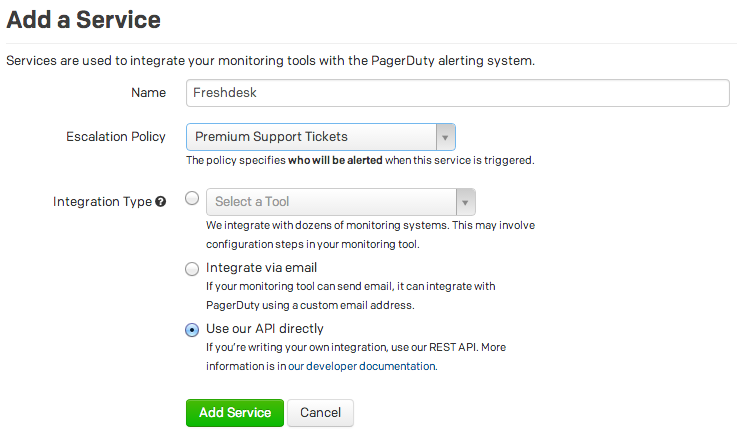
Next, click “Services” at the top. Then click the Add New Service button and set these fields:

Click Add Service. Make a note of the Service API Key. You’ll need this for later.
Edit your service and Uncheck the Incident Ack Timeout and Incident Auto-Resolution checkboxes. Click Save.
Optionally, configure some webhooks to point to other services you want to notify. For instance, we added Slack, so that we’ll instantly see any support requests in-chat.
Okay, you’re done here. Let’s move on to Freshdesk.
Setting up Freshdesk
Freshdesk is going to require four rules: One Dispatch’r and three Observers.
I’ll provide screenshots on this as a reference, along with some code and URLs you can copy/paste.
Start by logging in and going to the Administration page.
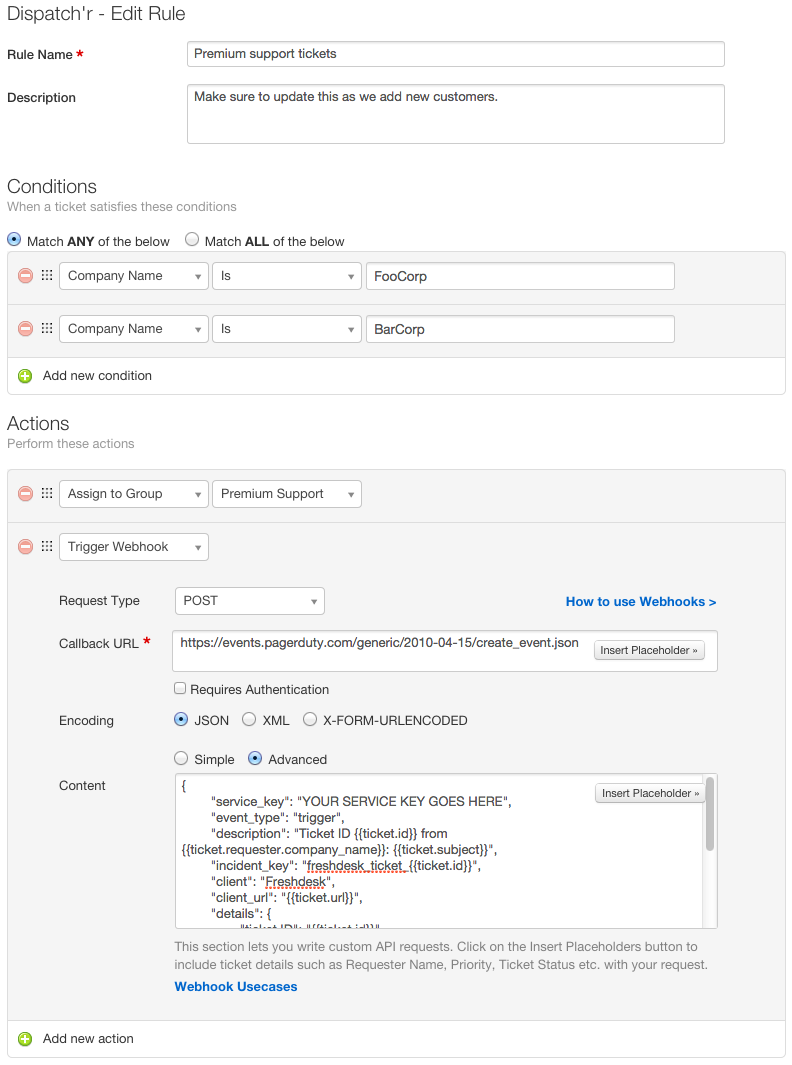
Dispatch’r Rule: Alert PagerDuty for important customer tickets
Click “Dispatch’r” and add a new rule.
Set the Rule name and Description to whatever you like. We added a little reminder in the description saying that this must be updated as we add customers.
For the conditions, we’re matching based on company names we’ve created in Freshdesk for our customers. You may instead want to base this on Product, From E-mail, Contact Name, or whatever you like.
For the Callback URL, use https://events.pagerduty.com/generic/2010-04-15/create_event.json. Keep note of this, because you’ll use it for all the payloads you’ll set.
Now set the Content to be the following.
{
    "service_key": "YOUR SECRET KEY GOES HERE",
    "event_type": "trigger",
    "description": "Ticket ID {{ticket.id}} from {{ticket.requester.company_name}}: {{ticket.subject}}",
    "incident_key": "freshdesk_ticket_{{ticket.id}}",
    "client": "Freshdesk",
    "client_url": "{{ticket.url}}",
    "details": {
        "ticket ID": "{{ticket.id}}",
        "status": "{{ticket.status}}",
        "priority": "{{ticket.priority}}",
        "type": "{{ticket.ticket_type}}",
        "due by": "{{ticket.due_by_time}}",
        "requester": "{{ticket.requester.name}}",
        "requester e-mail": "{{ticket.from_email}}"
    }
}
Make note of the whole YOUR SERVICE KEY GOES HERE part in line 2. Remember the service key in PagerDuty? You’ll set that here. You’ll also need to do this for all the webhook payloads I show you from here on out.
Go ahead and add any other actions you may want (such as adding watchers, or setting the priority), and click Save.
Click Reorder and place that rule at the top.
Setting up Freshdesk Observer
Now we need to set up a few observers. Go back to the Administration page and click “Observer.” We’ll be adding three new rules.
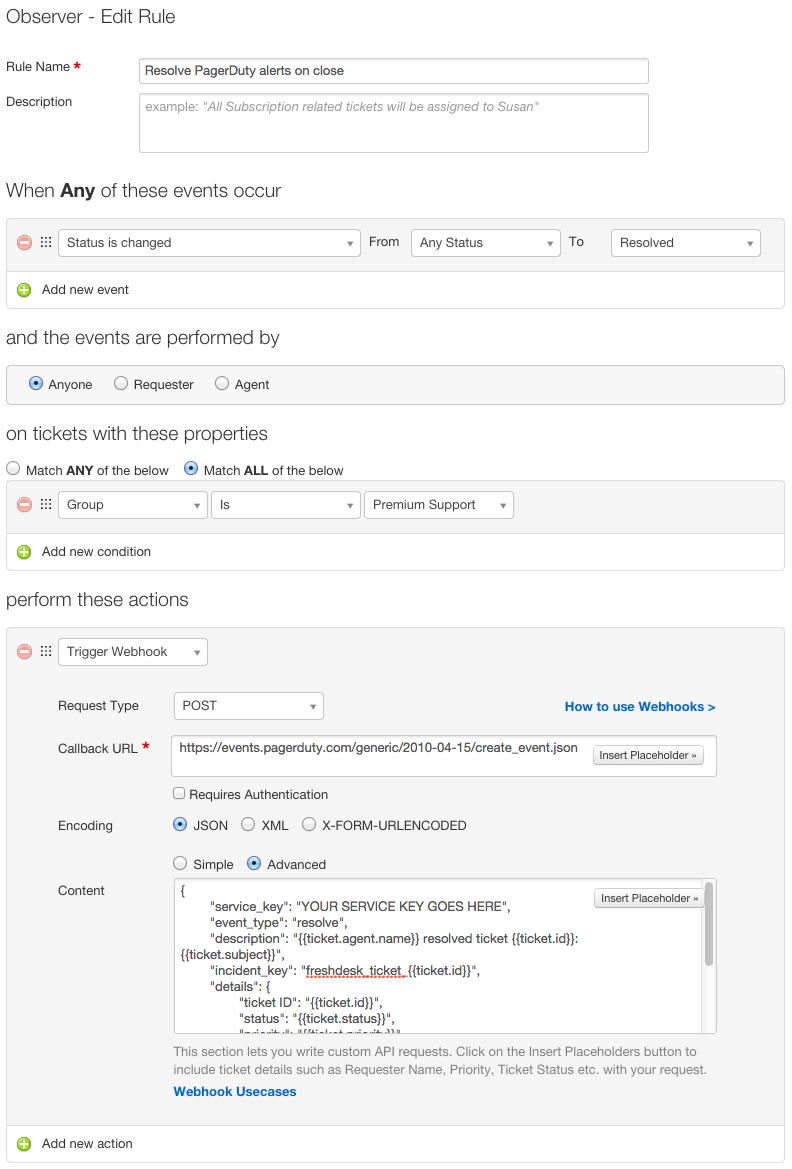
Observer Rule #1: Resolve PagerDuty alerts on close
Add an event. You’ll set:
Use the same Callback URL as earlier, and set the Content to:
{
    "service_key": "YOUR SERVICE KEY GOES HERE",
    "event_type": "resolve",
    "description": "{{ticket.agent.name}} resolved ticket {{ticket.id}}: {{ticket.subject}}",
    "incident_key": "freshdesk_ticket_{{ticket.id}}",
    "details": {
        "ticket ID": "{{ticket.id}}",
        "status": "{{ticket.status}}",
        "priority": "{{ticket.priority}}",
        "type": "{{ticket.ticket_type}}",
        "due by": "{{ticket.due_by_time}}",
        "requester": "{{ticket.requester.name}}",
        "requester e-mail": "{{ticket.from_email}}"
    }
}
Don’t forget that service key!
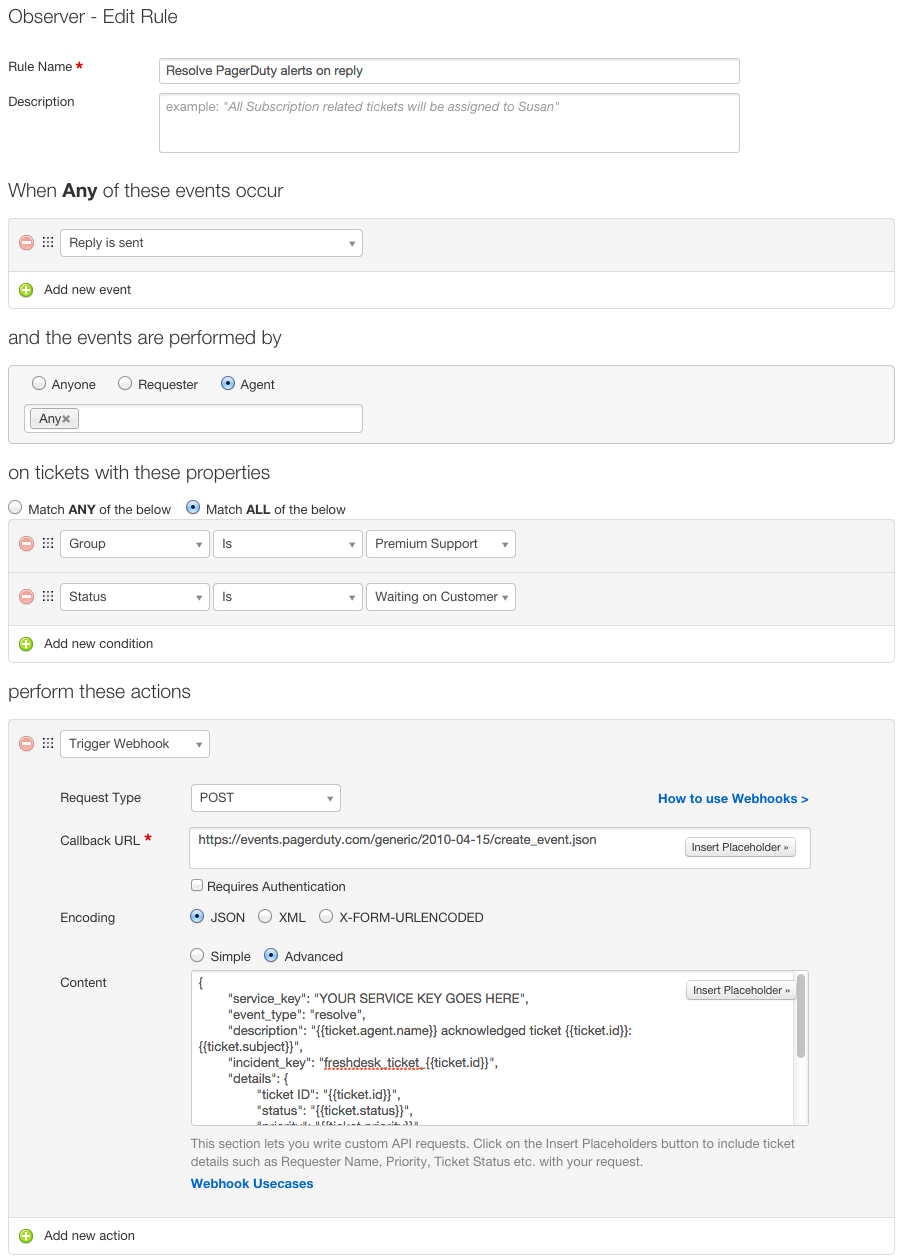
Observer Rule #2: Resolve PagerDuty alerts on agent reply
Let’s add a new event. This one will resovle your PagerDuty alert when an agent replies to it.
Again, same Callback URL, with this Content (and your service key):
{
    "service_key": "YOUR SERVICE KEY GOES HERE",
    "event_type": "resolve",
    "description": "{{ticket.agent.name}} acknowledged ticket {{ticket.id}}: {{ticket.subject}}",
    "incident_key": "freshdesk_ticket_{{ticket.id}}",
    "details": {
        "ticket ID": "{{ticket.id}}",
        "status": "{{ticket.status}}",
        "priority": "{{ticket.priority}}",
        "type": "{{ticket.ticket_type}}",
        "due by": "{{ticket.due_by_time}}",
        "requester": "{{ticket.requester.name}}",
        "requester e-mail": "{{ticket.from_email}}"
    }
}
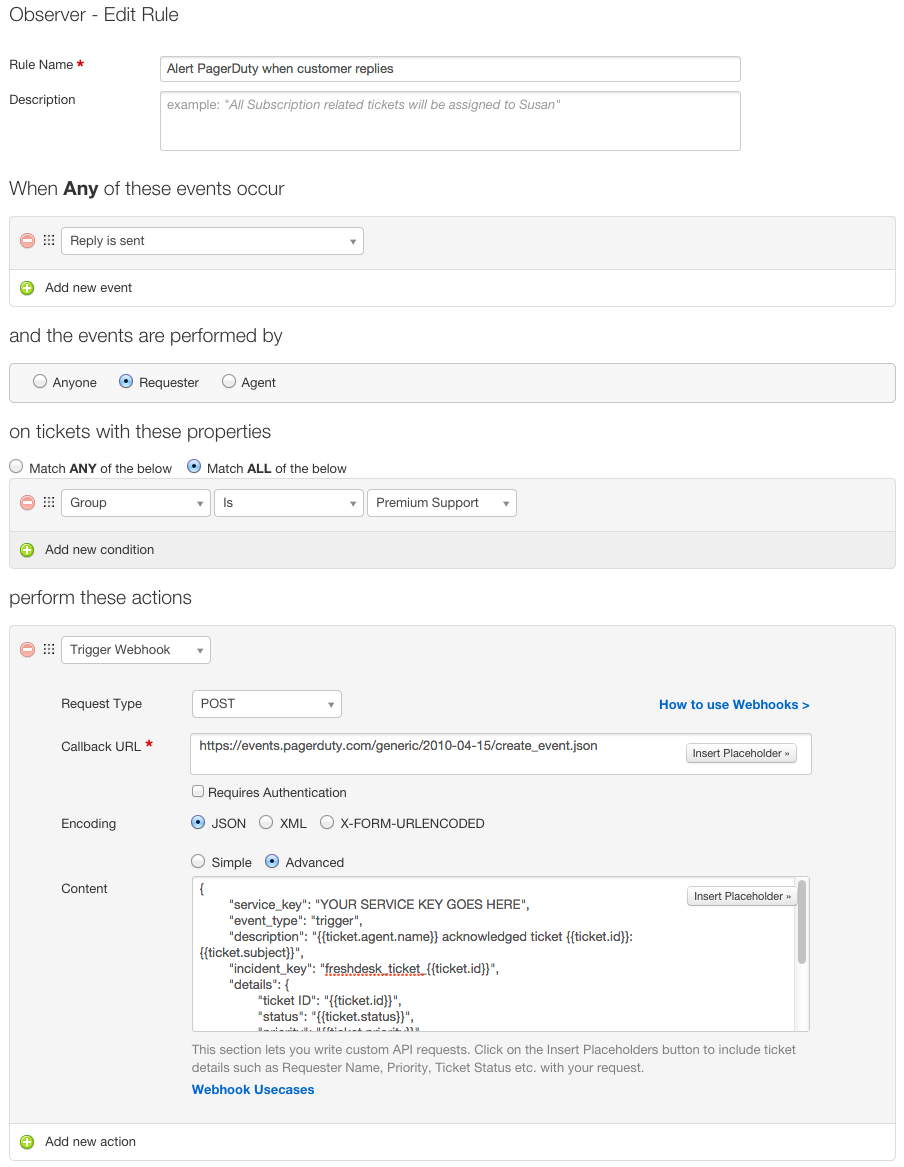
Observer Rule #3: Alert PagerDuty on customer reply
Here’s your Content:
{
    "service_key": "YOUR SERVICE KEY GOES HERE",
    "event_type": "trigger",
    "description": "{{ticket.agent.name}} acknowledged ticket {{ticket.id}}: {{ticket.subject}}",
    "incident_key": "freshdesk_ticket_{{ticket.id}}",
    "details": {
        "ticket ID": "{{ticket.id}}",
        "status": "{{ticket.status}}",
        "priority": "{{ticket.priority}}",
        "type": "{{ticket.ticket_type}}",
        "due by": "{{ticket.due_by_time}}",
        "requester": "{{ticket.requester.name}}",
        "requester e-mail": "{{ticket.from_email}}"
    }
}
Done!
You should now be set. Any incoming tickets that match the conditions you set in the Dispatch’r rule will be tracked by PagerDuty.
Now you have no excuse for missing those important support tickets! And your customers will thank you for it.