Beanbag

CodeMirror and Spell Checking: Solved
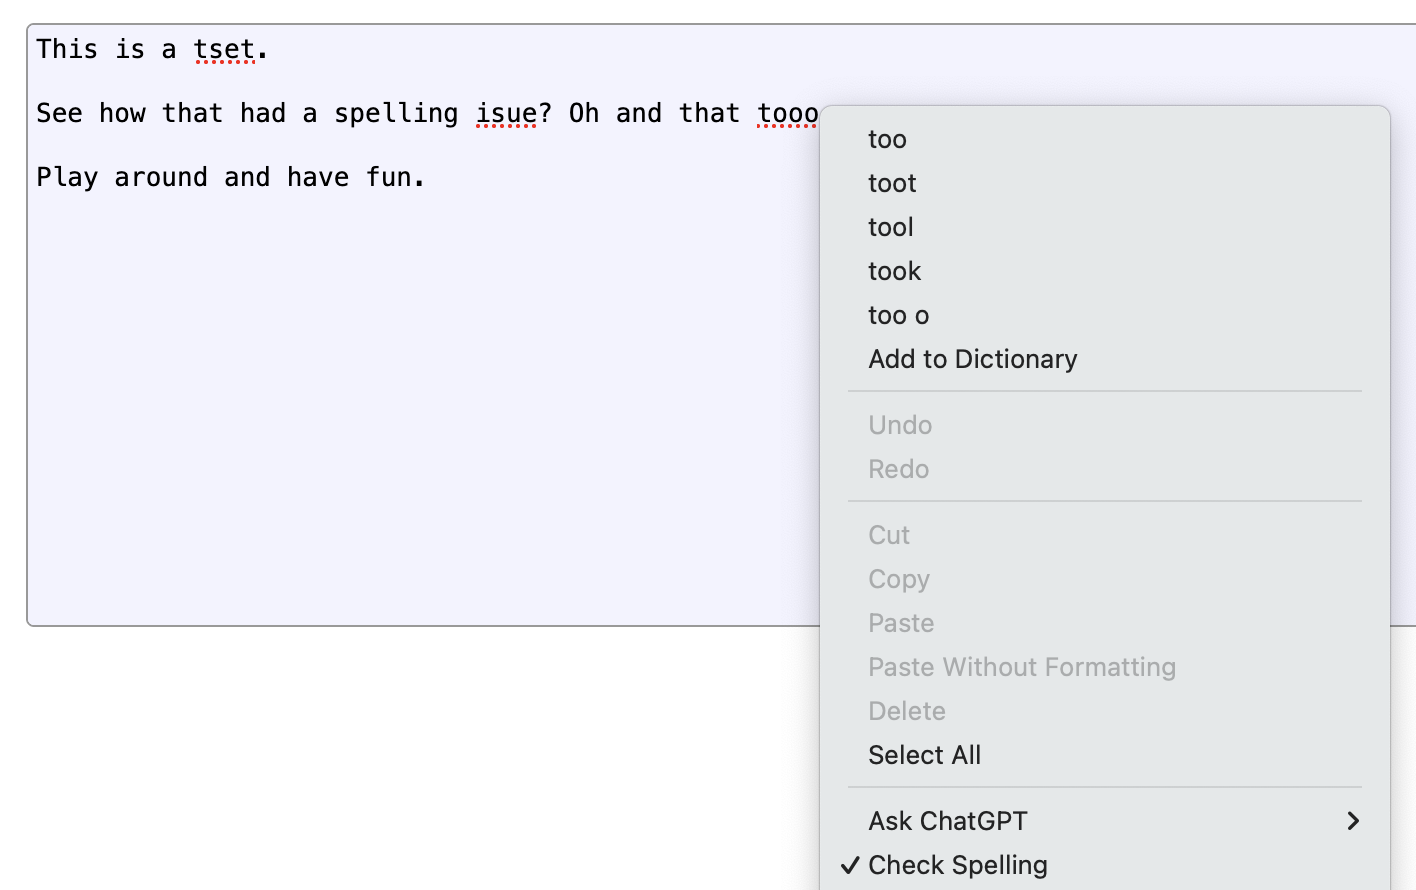
A screenshot of the CodeMirror editor with spelling issues and the browser's spell checking menu opened.

For years I’ve wanted spell checking in CodeMirror. We use CodeMirror in our Review Board code review tool for all text input, in order to allow on-the-fly syntax highlighting of code, inline image display, bold/italic, code literals, etc.

(We’re using CodeMirror v5, rather than v6, due to the years’ worth of useful plugins and the custom extensions we’ve built upon it. CodeMirror v6 is a different beast. You should check it out, but we’re going to be using v5 for our examples here. Much of this can likely be leveraged for other editing components as well.)

CodeMirror is a great component for the web, and I have a ton of respect for the project, but its lack of spell checking has always been a complaint for our users.

And the reason for that problem lies mostly on the browsers and “standards.” Starting with…

ContentEditable Mode

Browsers support opting an element into what’s called Content Editable mode. This allows any element to become editable right in the browser, like a fancy <textarea>, with a lot of pretty cool capabilities:

  • Rich text editing
  • Rich copy/paste
  • Selection management
  • Integration with spell checkers, grammar checkers, AI writing assistants
  • Works as you’d expect with your device’s native input methods (virtual keyboard, speech-to-text, etc.)

Simply apply contenteditable="true" to an element, and you can begin typing away. Add spellcheck="true" and you get spell checking for free. Try it!

And maybe you don’t even need spellcheck="true"! The browser may just turn it on automatically. But you may need spellcheck="false" if you don’t want it on. And it might stay on anyway!

Here we reach the first of many inconsistencies. Content Editable mode is complex and not perfectly consistent across browsers (though it’s gotten better). A few things you might run into include:

  • Ranges for selection events and input events can be inconsistent across browsers and are full of edge cases (you’ll be doing a lot of “let me walk the DOM and count characters carefully to find out where this selection really starts” checks).
  • Spell checking behaves quite differently on different browsers (especially in Chrome and Safari, which might recognize a word as misspelled but won’t always show it).
  • Rich copy/paste may mess with your DOM structure in ways you don’t expect.
  • Programmatic manipulating of the text content using execCommand is deprecated with no suitable replacement (and you don’t want to mess with the DOM directly or you break Undo/Redo). It also doesn’t always play nice with input events.

CodeMirror v5 tries to let the browser do its thing and sync state back, but this doesn’t always work. Replacing misspelled words on Safari or Chrome can sometimes cause text to flip back-and-forth. Data can be lost. Cursor positions can change. It can be a mess.

So while CodeMirror will let you enable both Content Editable and Spell Checking modes, it’s at your own peril.

Which is why we never enabled it.

How do we fix this?

When CodeMirror v5 was introduced, there weren’t a lot of options. But browsers have improved since.

The secret sauce is the beforeinput event.

There are a lot of operations that can involve placing new text in a Content Editable:

  • Replacing a misspelled word
  • Using speech-to-text
  • Having AI generate content or rewrite existing content
  • Transforming text to Title Case

These will generate a beforeinput event before making the change, and an input event after making the change.

Both events provide:

  1. The type of operation:
    1. insertText for text-to-speech or newly-generated text
    2. insertReplacementText for spelling replacements, AI rewrites, and other similar operations
  2. The range of text being replaced (or where new text will be inserted)
  3. The new data (either as InputEvent.data in the form of one or more InputEvent.dataTransferItem.items[] entries)

Thankfully, beforeinput can be canceled, which prevents the operation from going through.

This is our way in. We can treat these operations as requests that CodeMirror can fulfill, instead of changes CodeMirror must react to.
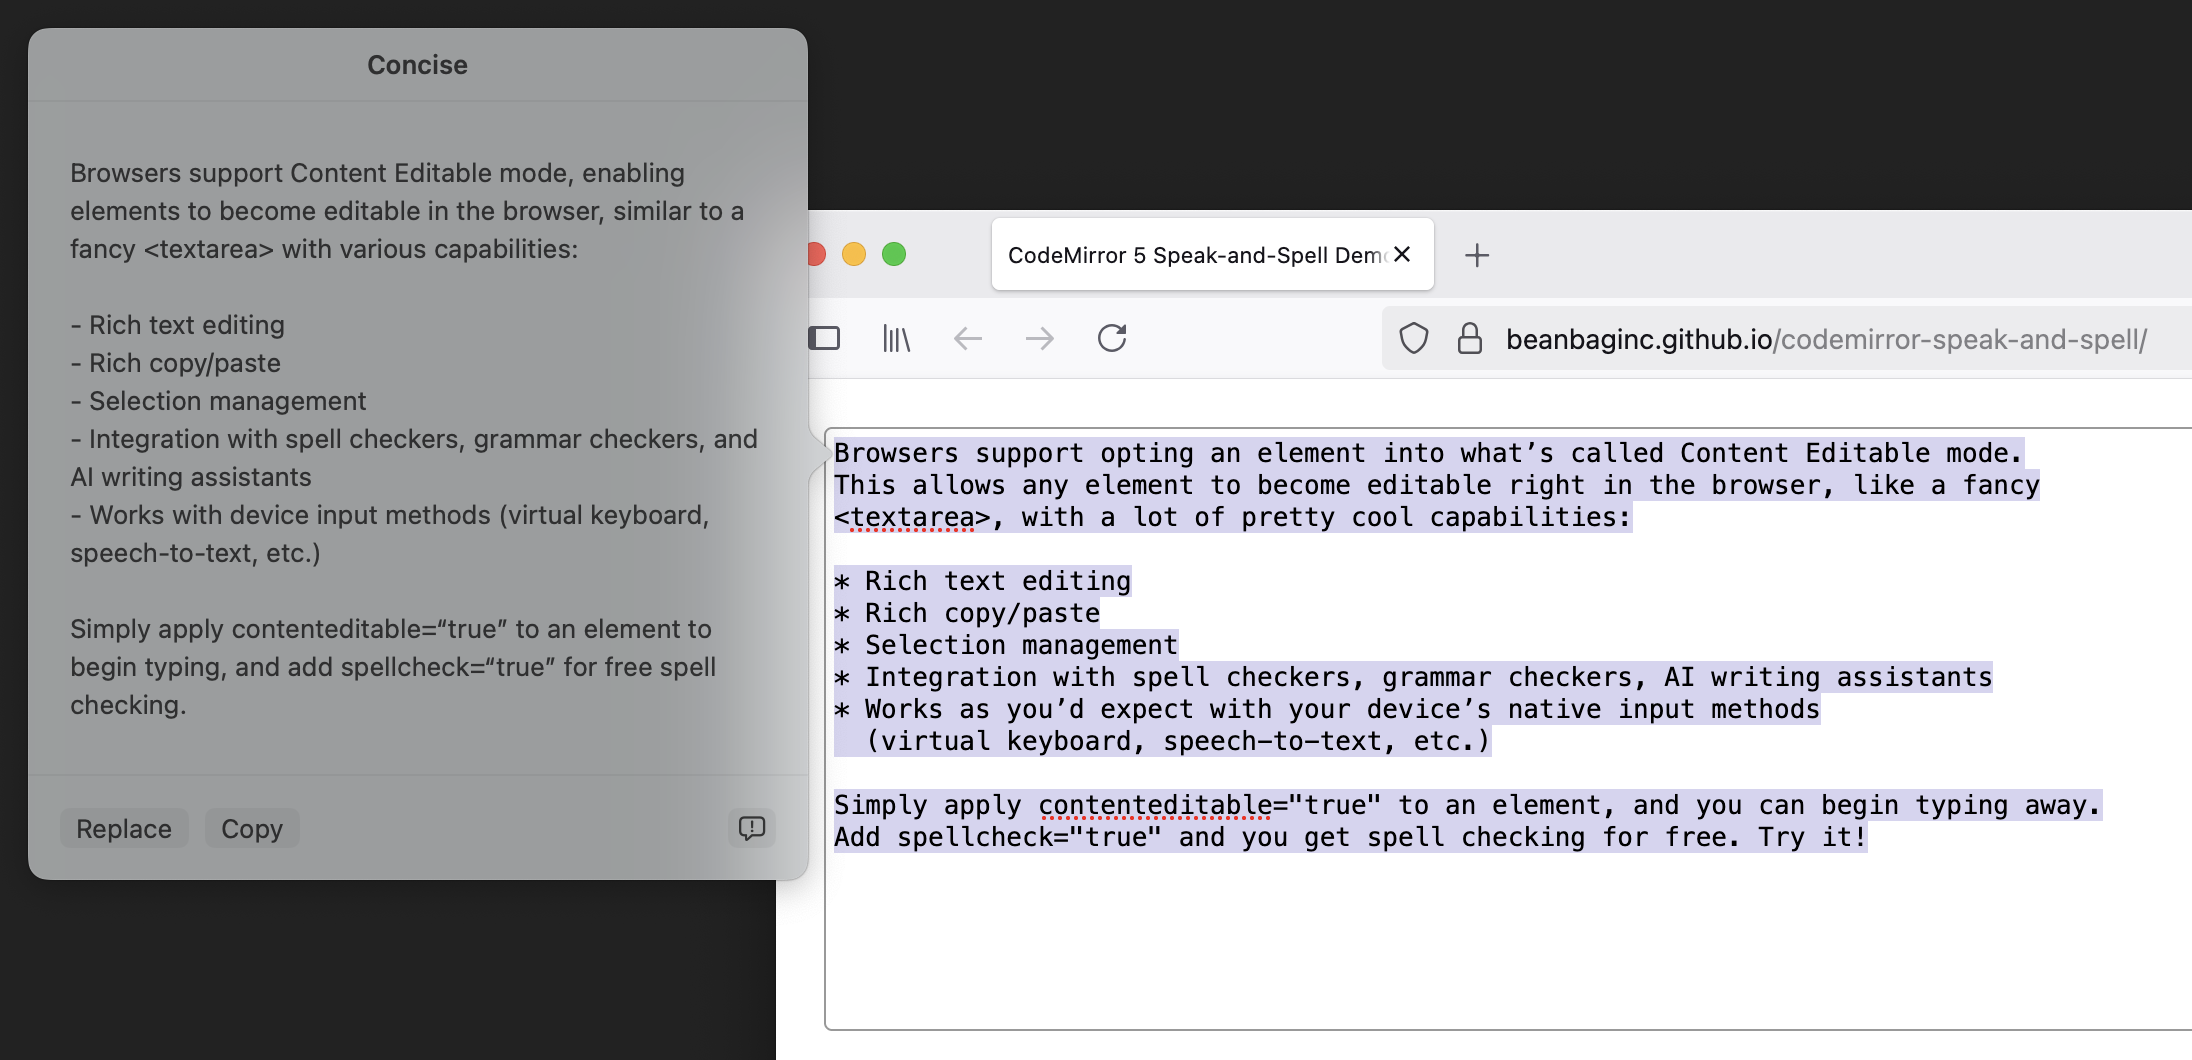
A screenshot of a text field in CodeMirror with text highlighted and macOS's AI Writing Tools providing a concise version of the text.

Putting our plan into action

Here’s the general approach:

  1. Listen to beforeinput on CodeMirror’s input element (codemirror.display.input.div).
  2. Filter for the following InputEvent.inputType values: 'insertReplacementText', 'insertText'.
  3. Fetch the ranges and the new plain text data from the InputEvent.
  4. For each range:
    1. Convert each range into a start/end line number within CodeMirror, and a start/end within each line.
    2. Issue a CodeMirror.replaceRange() with the normalized ranges and the new text.

Simple in theory, but there’s a few things to get right:

  1. Different browsers and different operations will report those ranges on different elements. They might be text nodes, they might be a parent element, or they might be the top-level contenteditable element. Or a combination. So we need to be very careful about our assumptions.
  2. We need to be able to calculate those line numbers and offsets. We won’t necessarily have that information up-front, and it depends on what nodes we get in the ranges.
  3. The text data can come from more than one place:
    1. An InputEvent.data attribute value
    2. One or more strings accessed asynchronously from InputEvent.dataTransfer.items[], in plain text, HTML, or potentially other forms.
  4. We may not have all of this! Even as recently as late-2024, Chrome wasn’t giving me target ranges in beforeinput, only in input, which was too late. So we’ll want to bail if anything goes wrong.

Let’s put this into practice. I’ll use TypeScript to help make some of this a bit more clear, but you can do all this in JavaScript.

Feel free to skip to the end, if you don’t want to read a couple pages of TypeScript.

1. Set up our event handler

We’re going to listen to beforeinput. If it’s an event we care about, we’ll grab the target ranges, take over from the browser (by canceling the event), and then prepare to replay the operation using CodeMirror’s API.

This is going to require a bit of help figuring out what lines and columns those ranges correspond to, which we’ll tackle next.

const inputEl = codeMirror.display.input.div;
	
inputEl.addEventListener('beforeinput',
                         (evt: InputEvent) => {
    if (evt.inputType !== 'insertReplacementText' &&
        evt.inputType !== 'insertText') {
        /*
         * This isn't a text replacement or new text event,
         * so we'll want to let the browser handle this.
         *
         * We could just preventDefault()/stopPropagation()
         * if we really wanted to play it safe.
         */
        return;
    }

    /*
     * Grab the ranges from the event. This might be
     * empty, which would have been the case on some
     * versions of Chrome I tested with before. Play it
     * safe, bail if we can't find a range.
     *
     * Each range will have an offset in a start container
     * and an offset in an end container. These containers
     * may be text nodes or some parent node (up to and
     * including inputEl).
     */
    const ranges = evt.getTargetRanges();

    if (!ranges || ranges.length === 0) {
        /* We got empty ranges. There's nothing to do. */
        return;
    }

    const newText =
           evt.data
        ?? evt.dataTransfer?.getData('text')
        ?? null;

	if (newText === null) {
		/* We couldn't locate any text, so bail. */
        return;
	}

    /*
     * We'll take over from here. We don't want the browser
     * messing with any state and impacting CodeMirror.
     * Instead, we'll run the operations through CodeMirror.
     */
    evt.preventDefault();
    evt.stopPropagation();

    /*
     * Place the new text in CodeMirror.
     *
     * For each range, we're getting offsets CodeMirror
     * can understand and then we're placing text there.
     *
     * findOffsetsForRange() is where a lot of magic
     * happens.
     */
    for (const range of state.ranges) {
        const [startOffset, endOffset] =
            findOffsetsForRange(range);

        codeMirror.replaceRange(
            newText,
            startOffset,
            endOffset,
            '+input',
        );
    }
});

This is pretty easy, and applicable to more than CodeMirror. But now we’ll get into some of the nitty-gritty.

2. Map from ranges to CodeMirror positions

Most of the hard work really comes from mapping the event’s ranges to CodeMirror line numbers and columns.

We need to know the following:

  1. Where each container node is in the document, for each end of the range.
  2. What line number each corresponds to.
  3. What the character offset is within that line.

This ultimately means a lot of traversing of the DOM (we can use TreeWalker for that) and counting characters. DOM traversal is an expense we want to incur as little as possible, so if we’re working on the same nodes for both end of the range, we’ll just calculate it once.

function findOffsetsForRange(
    range: StaticRange,
): [CodeMirror.Position, CodeMirror.Position] {
    /*
     * First, pull out the nodes and the nearest elements
     * from the ranges.
     *
     * The nodes may be text nodes, in which case we'll
     * need their parent for document traversal.
     */
    const startNode = range.startContainer;
    const endNode = range.endContainer;

    const startEl = (
        (startNode.nodeType === Node.ELEMENT_NODE)
        ? startNode as HTMLElement
        : startNode.parentElement);
    const endEl = (
        (endNode.nodeType === Node.ELEMENT_NODE)
        ? endNode as HTMLElement
        : endNode.parentElement);

    /*
     * Begin tracking the state we'll want to return or
     * use in future computations.
     *
     * In the optimal case, we'll be calculating some of
     * this only once and then reusing it.
     */
    let startLineNum = null;
    let endLineNum = null;
    let startOffsetBase = null;
    let startOffsetExtra = null;
    let endOffsetBase = null;
    let endOffsetExtra = null;

    let startCMLineEl: HTMLElement = null;
    let endCMLineEl: HTMLElement = null;

    /*
     * For both ends of the range, we'll need to first see
     * if we're at the top input element.
     *
     * If so, range offsets will be line-based rather than
     * character-based.
     *
     * Otherwise, we'll need to find the nearest line and
     * count characters until we reach our node.
     */
    if (startEl === inputEl) {
        startLineNum = range.startOffset;
    } else {
        startCMLineEl = startEl.closest('.CodeMirror-line');
        startOffsetBase = findCharOffsetForNode(startNode);
        startOffsetExtra = range.startOffset;
    }

    if (endEl === inputEl) {
        endLineNum = range.endOffset;
    } else {
        /*
         * If we can reuse the results from calculations
         * above, that'll save us some DOM traversal
         * operations. Otherwise, fall back to doing the
         * same logic we did above.
         */
        endCMLineEl =
            (range.endContainer === range.startContainer &&
             startCMLineEl !== null)
            ? startCMLineEl
            : endEl.closest(".CodeMirror-line");

        endOffsetBase =
            (startEl === endEl && startOffsetBase !== null)
            ? startOffsetBase
            : findCharOffsetForNode(endNode);
        endOffsetExtra = range.endOffset;
    }

    if (startLineNum === null || endLineNum === null) {
        /*
         * We need to find the line numbers that correspond
         * to either missing end of our range. To do this,
         * we have to walk the lines until we find both our
         * missing line numbers.
         */
        for (let i = 0;
             (i < children.length &&
              (startLineNum === null || endLineNum === null));
             i++) {
            const child = children[i];

            if (startLineNum === null &&
                child === startCMLineEl) {
                startLineNum = i;
            }

            if (endLineNum === null &&
                child === endCMLineEl) {
                endLineNum = i;
            }
        }
    }

    /*
     * Return our results.
     *
     * We may not have set some of the offsets above,
     * depending on whether we were working off of the
     * CodeMirror input element, a text node, or another
     * parent element. And we didn't want to set them any
     * earlier, because we were checking to see what we
     * computed and what we could reuse.
     *
     * At this point, anything we didn't calculate should
     * be 0.
     */
    return [
        {
            ch: (startOffsetBase || 0) +
                (startOffsetExtra || 0),
            line: startLineNum,
        },
        {
            ch: (endOffsetBase || 0) +
                (endOffsetExtra || 0),
            line: endLineNum,
        },
    ];
}


/*
 * The above took care of our line numbers and ranges, but
 * it got some help from the next function, which is designed
 * to calculate the character offset to a node from an
 * ancestor element.
 */
function findCharOffsetForNode(
    targetNode: Node,
): number {
    const targetEl = (
        targetNode.nodeType === Node.ELEMENT_NODE)
        ? targetNode as HTMLElement
        : targetNode.parentElement;
    const startEl = targetEl.closest('.CodeMirror-line');
    let offset = 0;

    const treeWalker = document.createTreeWalker(
        startEl,
        NodeFilter.SHOW_ELEMENT | NodeFilter.SHOW_TEXT,
    );

    while (treeWalker.nextNode()) {
        const node = treeWalker.currentNode;

        if (node === targetNode) {
            break;
        }

        if (node.nodeType === Node.TEXT_NODE) {
            offset += (node as Text).data.length;
        }
    }

    return offset;

}

Whew! That’s a lot of work.

CodeMirror has some similar logic internally, but it’s not exposed, and not quite what we want. If you were working on making all this work with another editing component, it’s possible this would be more straight-forward.

What does this all give us?

  1. Spell checking and replacements without (nearly as many) glitches in browsers
  2. Speech-to-text without CodeMirror stomping over results
  3. AI writing and rewriting, also without risk of lost data
  4. Transforming of text through other means.
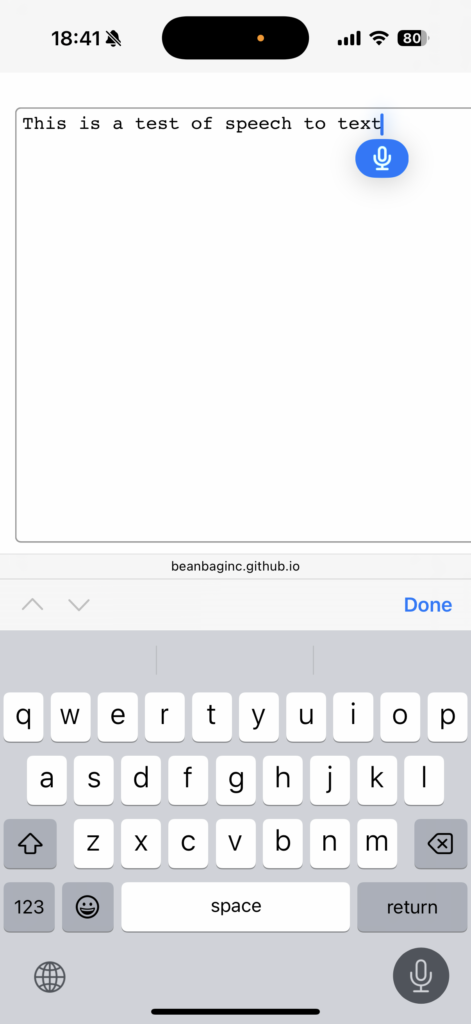
Since we took the control away from the browser and gave it to CodeMirror, we removed most of the risk and instability.

But there are still problems. While this works great on Firefox, Chrome and Safari are a different story. Those browsers are bit more lazy when it comes to spell checking, and even once it’s found some spelling errors, you might not see the red squigglies. Typing, clicking around, or forcing a round of spell checking might bring them back, but might not. But this is their implementation, and not the result of the CodeMirror integration.

Ideally, spell checking would become a first-class citizen on the web. And maybe this will happen someday, but for now, at least there are some workarounds to get it to play nicer with tools like CodeMirror.

We can go further

There’s so much more in InputEvent we could play with. We explored the insertReplacementText and insertText types, but there’s also:

  • insertLink
  • insertFromDrop
  • insertOrderedList
  • formatBold
  • historyUndo

And so many more.

These could be integrated deeper into CodeMirror, which may open some doors to a far more native feel on more platforms. But that’s left as an exercise to the reader (it’s pretty dependent on your CodeMirror modes and the UI you want to provide).

There are also improvements to be made, as this is not perfect yet (but it’s close!). Safari still doesn’t recognize when text is selected, leaving out the AI assisted tools, but Chrome and Firefox work great. We’re working on the rest.

Give it a try

You can try our demo live in your favorite browser. If it doesn’t work for you, let me know what your browser and version are. I’m very curious.

We’ve released this as a new CodeMirror v5 plugin, CodeMirror Speak-and-Spell (NPM). No dependencies. Just drop it into your environment and enable it on your CodeMirror editor, like so:

const codeMirror = new CodeMirror(element, {
  inputStyle: 'contenteditable',
  speakAndSpell: true,
  spellcheck: true,
});

CodeMirror v6 will come in the future, but probably not until we move to v6 (and we’re waiting on a lot of the v5 world to migrate over first).

CodeMirror and Spell Checking: Solved Read More »
A New Patching Process for RBTools 5.1

RBTools, our command line tool suite for Review Board, is getting all-new infrastructure for applying patches. This will be available in rbt patch, rbt land, and any custom code that needs to deal with patches.

A customer reported that multi-commit review requests won’t apply on Mercurial. The problem, it turns out, is that Mercurial won’t let you apply a patch if the working tree isn’t clean, and that includes if you’ve applied a prior patch in a series. That’s pretty annoying, but there are good reasons for it.

It can, however, apply multiple patches in one go. Which is nice, but impossible to use with RBTools today.

So this weekend, I began working on a new patch application process.

How SCMs apply patches

There are a lot of SCMs out there, and they all work a bit differently.

When dealing with patches, most are thin wrappers around GNU diff/patch, with a bit of pre/post-processing to deal with SCM-specific metadata in the patches.

The process usually looks like this:

  1. Extract SCM-specific data from the diff.

    The SCM patcher will read through the patch and look for any SCM-specific data to extract. This may include commit IDs/revisions, file modes, symlinks to apply, binary file changes, and commit messages and other metadata. It’ll usually validate the local checkout and any file modifications, to an extent.
  2. Normalize the diff, if needed.

    This can involve taking parts of the diff that can’t be passed to GNU patch (such as binary file changes, file/directory metadata changes) and setting those aside to handle specially. It may also split the patch into per-file segments. The results will be something that can be passed to GNU diff.
  3. Invoke the patcher (usually GNU patch or similar).

    This often involves calling an external patch program with a patch or an extracted per-file patch, checking the results, and choosing how to handle things like conflicts or staging a file for a commit or applying some metadata to the file.
  4. Invoke any custom patching logic.

    This is where logic specific to the SCM may be applied. Patching a binary file, changing directory metadata, setting up symlinks, etc.

SCMs can go any route with their patching logic, but that’s a decent overview of what to expect.

Depending on what that logic looks like, and what constraints the SCM imposes, this process may bail early. For instance, some will just let you apply a patch on top of a potentially-dirty working directory, and some will not.

Mercurial won’t, which brings us to this project.

Out with the old

RBTools uses an SCM abstraction model, with classes implementing features for specific SCMs. We determine the right backend for a local source tree, get an instance of that backend, and then call methods on it.

Patches are run through an apply_patch() method. It looks like this:

def apply_patch(
    self,
    patch_file: str,
    *,
    base_path: str,
    base_dir: str,
    p: Optional[str] = None,
    revert: bool = False,
) -> PatchResult:
    ...

This takes in a path to a patch file, some criteria like whether to revert or commit a patch, and a few other things. The SCM can then use the default GNU patch implementation, or it can use something SCM-specific.

At the end of this, we get a PatchResult, which the caller can use to determine if the patch applied, if there were conflicts, or if it just outright failed.

The problem is, each patch is handled independently. There’s no way to say “I have 5 patches. Do what you need to do to apply them.”

So we’re stuck applying one-by-one in Mercurial, and therefore we’re doomed to fail.

This architecture is old, and we’re ready to move on from it.

In with the new

We’re introducing new primitives in RBTools, which give SCMs full control over the whole process. Not only are these useful for RBTools commands, but for third-party code built upon RBTools.

Patch application is now made up of the following pieces:

  • Patch: A representation of a patch to apply, with all the information needed to apply it.
  • Patcher: A class responsible for applying and committing patches, built to allow SCM-specific subclasses to communicate patching capabilities and to define patching logic.
  • PatchResult: The result of a patch operation, covering one or more patches.

Patcher consolidates the roles of both the old apply_patch() and some of the internal logic within our rbt patch command. By default, it just feeds patches into GNU patch one-by-one, but SCMs can do whatever they need to here by pointing to a custom Patcher subclass and changing that logic.

Callers tell the Patcher, “Hey, I have these patches, and have these settings to consider (reverting, making commits, etc.)” and will then get back an object that says what the patcher is capable of doing.

They can then say “Okay, begin patching, and give me each PatchResult as you go.” The Patcher can apply them one-by-one or in batches (Mercurial will use batches), and send back useful PatchResults as appropriate.

That in turn gives the caller the ability to report progress on the process without assuming anything about what that process looks like.

And it Just Works (TM)

This design is very clean to use. Here’s an example:

review_request = api_root.get_review_request(review_request_id=123)

patcher = scmclient.get_patcher(patches=[
    Patch(content=b'...'),
    Patch(content=b'...'),
    Patch(content=b'...'),
])
total_patches = len(patcher.patches)

try:
    if patcher.can_commit:
        print(f'Preparing to commit {total_patches} patches...')
        patcher.prepare_for_commit(review_request=review_request)
    else:
        print(f'Preparing to apply {total_patches} patches...')

    for patch_result in patcher.patch():
        print(f'Applied patch {patch_result.patch_num} / {total_patches}')
except ApplyPatchError as e:
    patch_result = e.failed_patch_result

    if patch_result:
        print(f'Error applying patch {patch_result.patch_num}: {e}')

        if patch_result.has_conflicts:
            print()
            print('Conflicts:')

            for conflict in patch_result.conflicts:
                print(f'* {conflict}')
    else:
        print(f'Error applying patches: {e}')

In this example, we:

  1. Defined three patches to apply
  2. Requested to perform commits if possible, using the review request information to aid in the process.
  3. Displayed progress for any patched files.
  4. Handled any patching errors, and showing any failed patch numbers and any conflicts if that information is available.

This will work across all SCMs, entirely backed by the SCM’s own patching logic.

This is still very much in progress, but is slated for RBTools 5.1, coming soon.

Until then, check out our all-new Review Board 7 release and our all-new Review Board Discord channel, open for all developers and for Review Board users alike.

A New Patching Process for RBTools 5.1 Read More »

Review Board: Between Then and Now

I just realized, before I know it, we’ll be hitting 20 years of Review Board.

Man, do I feel old.

It’s hard to imagine it now, but code review wasn’t really a thing when we built Review Board back in 2006. There were a couple expensive enterprise tools, but GitHub? Pull requests? They didn’t exist yet.

This meant we had to solve a lot of problems that didn’t have readily-made or readily-understood solutions, like:

🤔 What should a review even *be*? What’s involved in the review process, and what tools do you give the user?

We came up with tools like:

  • Resolvable Issue Tracking (a To Do list of what needs to be done in a change)
  • Comments spanning 1 or more lines of diffs
  • Image file attachment review
  • Previews of commented areas appearing above the comments.

Amongst others.

🤔 How should you discuss in a review? Message board style, with one box per reply? Everything embedded in top-level reviews? Comments scattered in a diff?

We decided on a box per review, and replies embedded within it, keeping discussion about a topic all in one place.

Explicitly not buried in a diff, because in complex projects, you also may be reviewing images, documents, or other files. Those comments are important, so we decided they should all live, threaded, under a review.

A lot of tools went the “scatter in a diff” route, and while that was standard for a while, it never sat right with me. For anything complex, it was a mess. I think we got this one right.

🤔 How do you let users keep track of what needs to be reviewed?

We came up with our Dashboard, which shows a sortable, filterable, customizable view of all review requests you may be interested in. This gave a bird’s-eye view across any number of source code repositories, teams, and projects.

Many tools didn’t go this route. You were limited to seeing review requests/pull requests on that repository, and that’s it. For larger organizations, this just wasn’t good enough.

🤔 How do you give organizations control over their processes? A policy editor? APIs? Fork the code?

We settled on:

  • A Python extension framework. This was capable of letting developers craft new policy, collect custom information during the review process, and even build whole new review UIs for files.
  • A full-blown REST API, which is quite capable.
  • Eventually, features like WebHooks, once those became a thing.

Our goal was to avoid people ever having to fork. But also, we kept Review Board MIT-licensed, so people were sure to have the control they needed.

I could probably go on for a while. A lot of these eventually worked their way into other code review tools on the market, and are standard now, but many started off as a lot of long nights doodling on a whiteboard and in notebooks.

We’ve had the opportunity to work for years with household names that young me would have never imagined. If you’ve been on the Internet at all in the past decade, you’ve regularly interacted with at least one thing built in Review Board.

But the passage of time and the changes in the development world make it hard these days. We’re an older tool now, and people like shiny new things. That’s okay. We’re still building some innovative shiny things. More on some of those soon 😉

This is a longer post than I planned for, but this stuff’s on my mind a lot lately.

I’ve largely been quiet lately about development, but I’m trying to change that. Develop in the open, as they say. Expect a barrage of behind-the-scenes posts coming soon.

Review Board: Between Then and Now Read More »

Using Freshdesk with PagerDuty for Better Customer Support

At Beanbag, we’ve been using Freshdesk to handle customer support for Review Board, Power Pack, and RBCommons.

We’ve also been using PagerDuty to inform us on any critical events, such as servers going down, memory/CPU load, or security updates we need to apply to our servers.

Our customers’ problems are just as important to us as our servers’ problems, but we were lacking a great way to really get our attention when our customers needed it most. After we started using PagerDuty, the solution became obvious: Integrate PagerDuty with Freshdesk! But how? Neither side had any native integration with the other.

Enter Freshdesk webhooks

Freshdesk’s webhooks support is pretty awesome. Not only can you set them up for any custom condition you like, but payload they send is completely customizable, allowing you to easily construct an API request to another service – like PagerDuty!

This is super useful. It means you won’t need any sort of proxy service or custom script to be set up on your server. All you need are your Freshdesk and PagerDuty accounts.

Deciding on your setup

There are probably many ways you can configure these two to talk, and we played with a couple configurations. Here are the general rules we settled on:

  • Only integrate PagerDuty for paying customers (with whom we have support contracts). We don’t want alerts from random people e-mailing us.
  • When a paying customer open new tickets or reply to existing tickets, assign them to a “Premium Support” group, and create an alert in PagerDuty.
  • When an agent replies or marks a ticket in “Premium Support” as resolved, resolve the alert in PagerDuty.

We always resolve the alert instead of acknowledging it, in order to prevent PagerDuty from auto-unacknowledging a period of time after the agent replies. When the customer replies, it will just reuse the same alert ID, instead of creating new alerts.

Also note that we’re setting things up to alert all of our support staff (all two of us founders) on any important tickets. You may wish to adjust these rules to do something a bit more fine-grained.

Okay, let’s get this set up.

Setting up PagerDuty

We’re going to create a custom Service in PagerDuty. First, log into PagerDuty and click “Escalation Policies” at the top. Then click the New Escalation Policy button.

Name this policy something like “Premium Support Tickets,” and assign your agents.

Next, click “Services” at the top. Then click the Add New Service button and set these fields:

title

Click Add Service. Make a note of the Service API Key. You’ll need this for later.

Edit your service and Uncheck the Incident Ack Timeout and Incident Auto-Resolution checkboxes. Click Save.

Optionally, configure some webhooks to point to other services you want to notify. For instance, we added Slack, so that we’ll instantly see any support requests in-chat.

Okay, you’re done here. Let’s move on to Freshdesk.

Setting up Freshdesk

Freshdesk is going to require four rules: One Dispatch’r and three Observers.

I’ll provide screenshots on this as a reference, along with some code and URLs you can copy/paste.

Start by logging in and going to the Administration page.

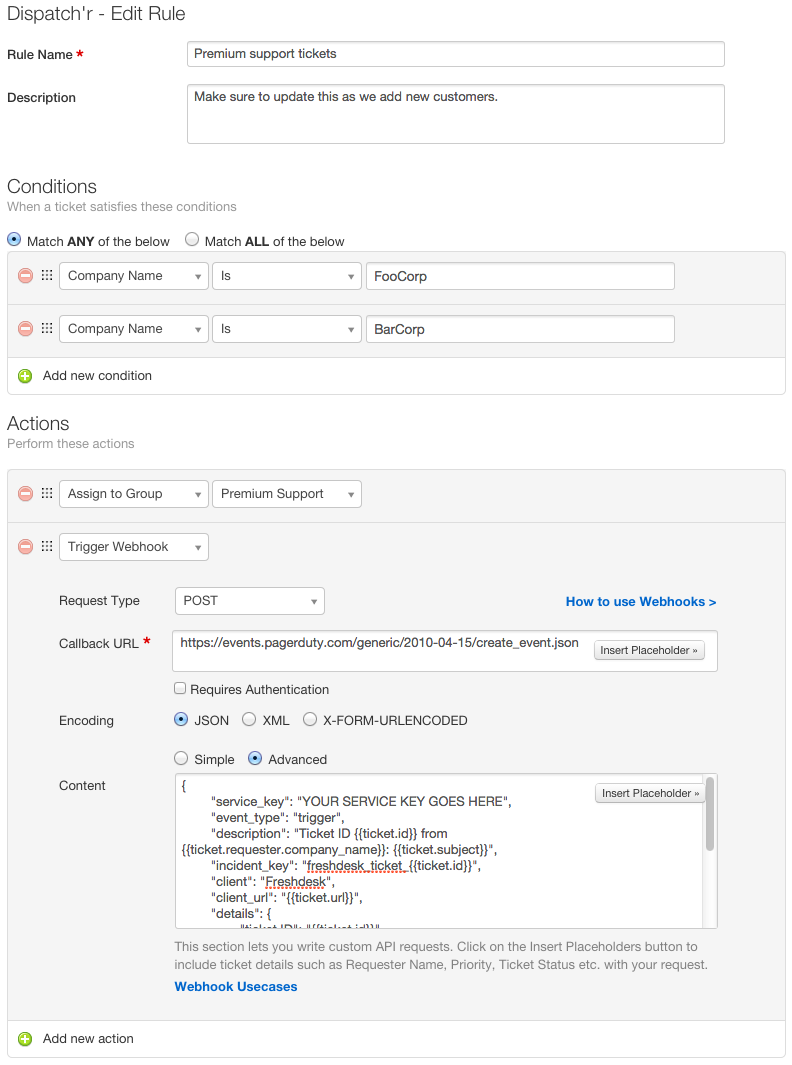
Dispatch’r Rule: Alert PagerDuty for important customer tickets

Click “Dispatch’r” and add a new rule.

Dispatchr rule

Set the Rule name and Description to whatever you like. We added a little reminder in the description saying that this must be updated as we add customers.

For the conditions, we’re matching based on company names we’ve created in Freshdesk for our customers. You may instead want to base this on Product, From E-mail, Contact Name, or whatever you like.

For the Callback URL, use https://events.pagerduty.com/generic/2010-04-15/create_event.json. Keep note of this, because you’ll use it for all the payloads you’ll set.

Now set the Content to be the following.

{
    "service_key": "YOUR SECRET KEY GOES HERE",
    "event_type": "trigger",
    "description": "Ticket ID {{ticket.id}} from {{ticket.requester.company_name}}: {{ticket.subject}}",
    "incident_key": "freshdesk_ticket_{{ticket.id}}",
    "client": "Freshdesk",
    "client_url": "{{ticket.url}}",
    "details": {
        "ticket ID": "{{ticket.id}}",
        "status": "{{ticket.status}}",
        "priority": "{{ticket.priority}}",
        "type": "{{ticket.ticket_type}}",
        "due by": "{{ticket.due_by_time}}",
        "requester": "{{ticket.requester.name}}",
        "requester e-mail": "{{ticket.from_email}}"
    }
}

Make note of the whole YOUR SERVICE KEY GOES HERE part in line 2. Remember the service key in PagerDuty? You’ll set that here. You’ll also need to do this for all the webhook payloads I show you from here on out.

Go ahead and add any other actions you may want (such as adding watchers, or setting the priority), and click Save.

Click Reorder and place that rule at the top.

Setting up Freshdesk Observer

Now we need to set up a few observers. Go back to the Administration page and click “Observer.” We’ll be adding three new rules.

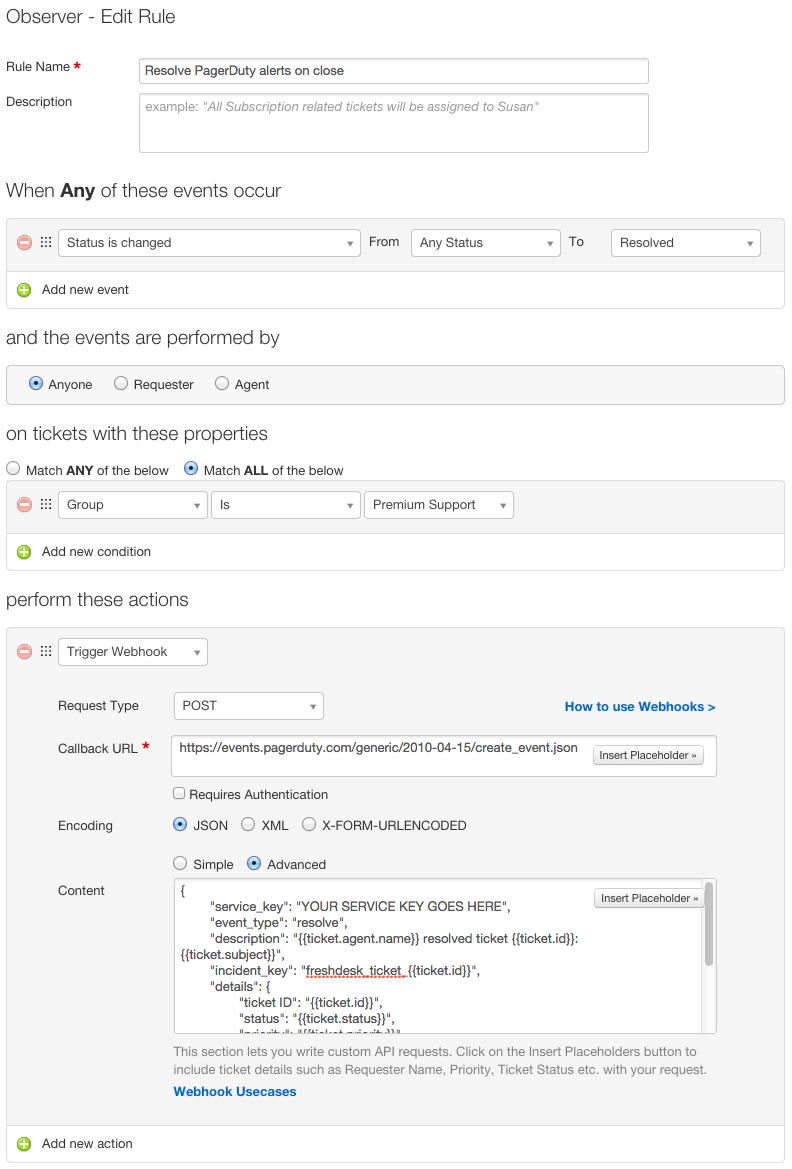
Observer Rule #1: Resolve PagerDuty alerts on close

Add an event. You’ll set:

Resolve on Close rule

Use the same Callback URL as earlier, and set the Content to:

{
    "service_key": "YOUR SERVICE KEY GOES HERE",
    "event_type": "resolve",
    "description": "{{ticket.agent.name}} resolved ticket {{ticket.id}}: {{ticket.subject}}",
    "incident_key": "freshdesk_ticket_{{ticket.id}}",
    "details": {
        "ticket ID": "{{ticket.id}}",
        "status": "{{ticket.status}}",
        "priority": "{{ticket.priority}}",
        "type": "{{ticket.ticket_type}}",
        "due by": "{{ticket.due_by_time}}",
        "requester": "{{ticket.requester.name}}",
        "requester e-mail": "{{ticket.from_email}}"
    }
}

Don’t forget that service key!

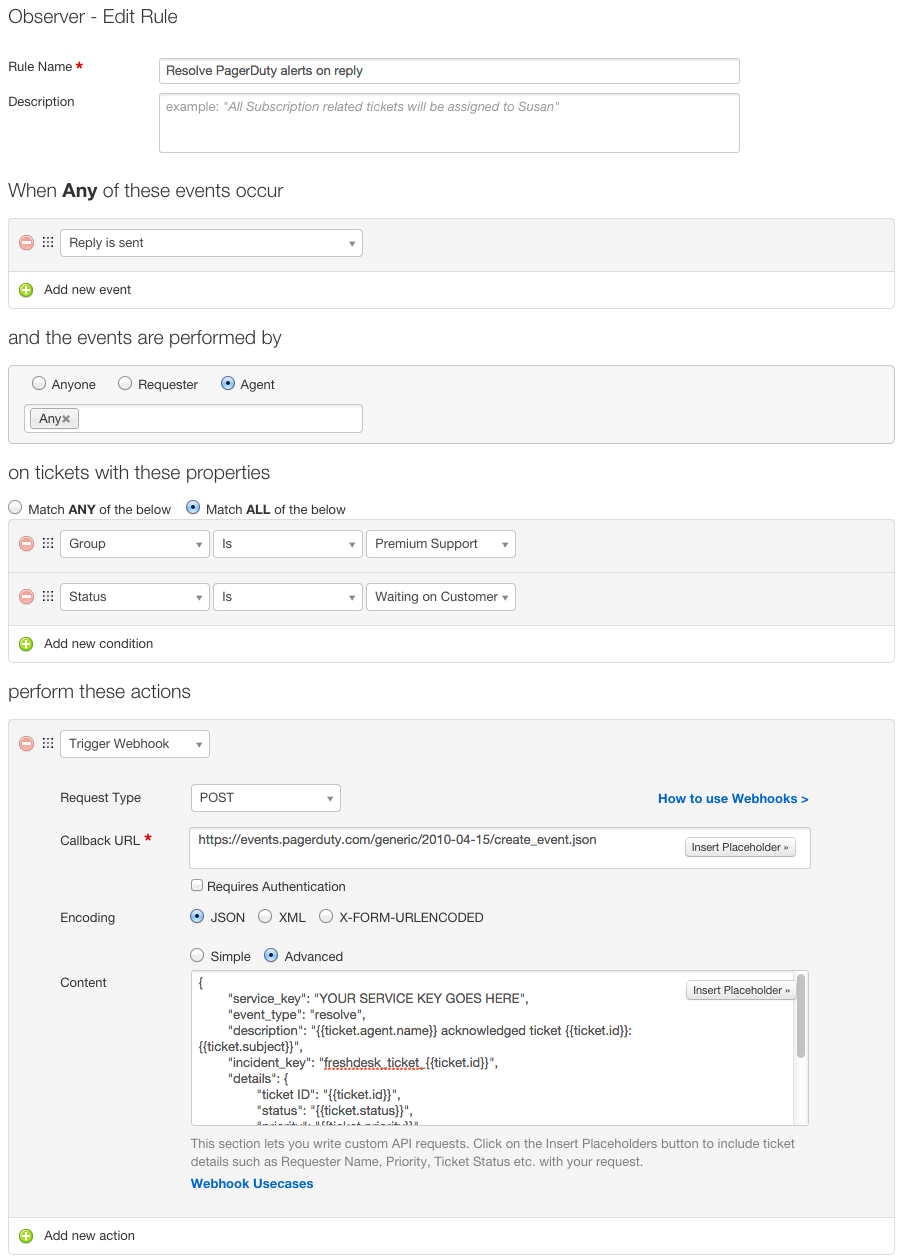
Observer Rule #2: Resolve PagerDuty alerts on agent reply

Let’s add a new event. This one will resovle your PagerDuty alert when an agent replies to it.

Resolve on Reply rule

Again, same Callback URL, with this Content (and your service key):

{
    "service_key": "YOUR SERVICE KEY GOES HERE",
    "event_type": "resolve",
    "description": "{{ticket.agent.name}} acknowledged ticket {{ticket.id}}: {{ticket.subject}}",
    "incident_key": "freshdesk_ticket_{{ticket.id}}",
    "details": {
        "ticket ID": "{{ticket.id}}",
        "status": "{{ticket.status}}",
        "priority": "{{ticket.priority}}",
        "type": "{{ticket.ticket_type}}",
        "due by": "{{ticket.due_by_time}}",
        "requester": "{{ticket.requester.name}}",
        "requester e-mail": "{{ticket.from_email}}"
    }
}

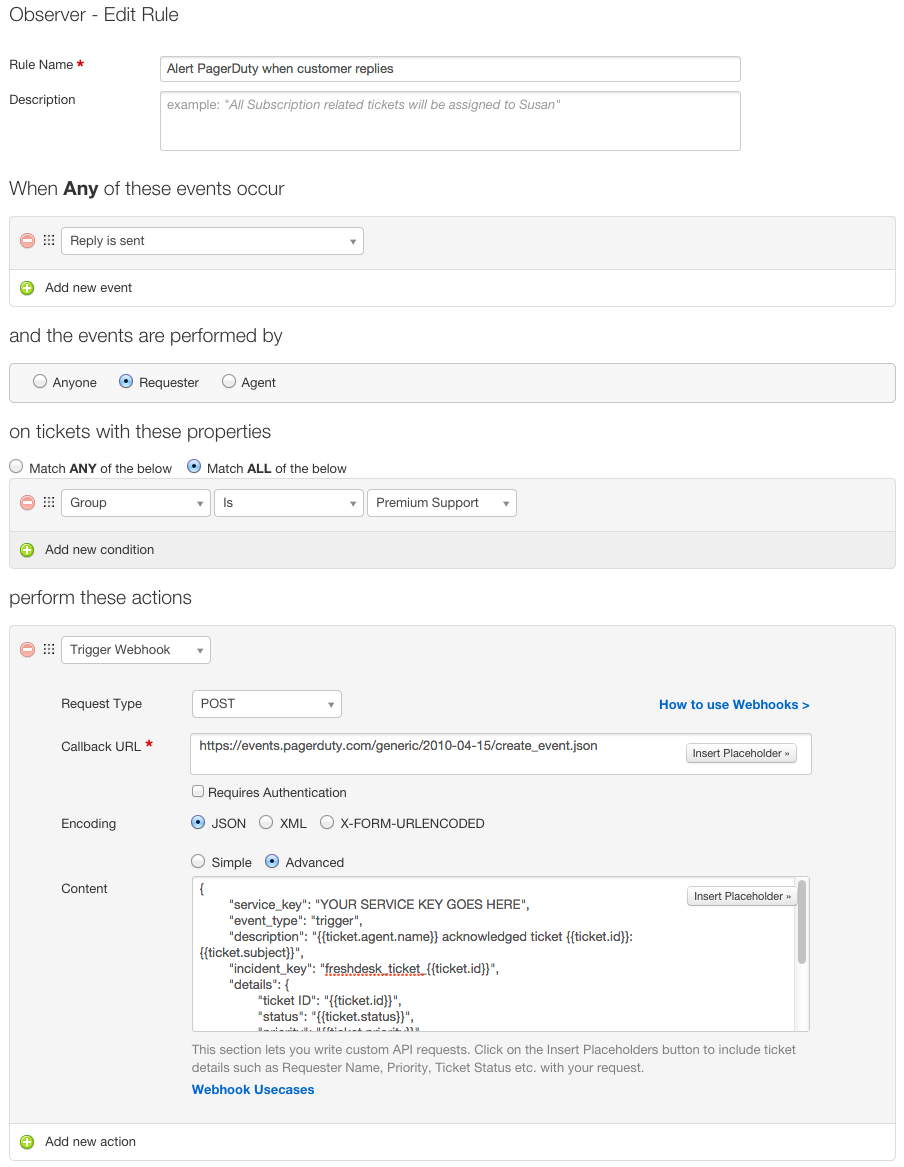
Observer Rule #3: Alert PagerDuty on customer reply

title

Here’s your Content:

{
    "service_key": "YOUR SERVICE KEY GOES HERE",
    "event_type": "trigger",
    "description": "{{ticket.agent.name}} acknowledged ticket {{ticket.id}}: {{ticket.subject}}",
    "incident_key": "freshdesk_ticket_{{ticket.id}}",
    "details": {
        "ticket ID": "{{ticket.id}}",
        "status": "{{ticket.status}}",
        "priority": "{{ticket.priority}}",
        "type": "{{ticket.ticket_type}}",
        "due by": "{{ticket.due_by_time}}",
        "requester": "{{ticket.requester.name}}",
        "requester e-mail": "{{ticket.from_email}}"
    }
}

Done!

You should now be set. Any incoming tickets that match the conditions you set in the Dispatch’r rule will be tracked by PagerDuty.

Now you have no excuse for missing those important support tickets! And your customers will thank you for it.

Using Freshdesk with PagerDuty for Better Customer Support Read More »

Looking Back on Review Board

Just over 3.5 years ago, David Trowbridge and I spent some time discussing the annoyances of the typical patch submission and code review processes in the open source projects we participated in and at companies, and decided to play with some ideas for improving this. At the time, we knew very little about what we intended to do. We had a name for it pretty early on, but that was about all we had. We didn’t even know whether we’d get past an early prototyping stage. But here it is, over 3 years later, and we have the leading open source code review tool with an active support and development community, hundreds of companies using it, and exciting new innovations for aiding in the code review process.

I was thinking a few days ago about how far we’ve come and some of the decisions we made along the way. I went digging through our commit history in order to relive some of the past of our little project. Since so few people were even aware of Review Board’s existence at the time, I thought I’d share some of our history with you. Particularly the interesting and funny bits.

“Add the reviewboard.”

Commit #1. The very first thing we put in our Subversion tree on September 27, 2006. I don’t even remember what was in this change now. We transitioned to Git last year and this commit is now just plain empty. Maybe it was jut the directory structure? Who can say.

Early on, we didn’t refer to “Review Board” as a proper name. It was generally “the reviewboard” or something similar. The codebase was young. We didn’t actually do code review on the project at this point (and it shows!). The first few months are littered with odd or nonsensical commit messages, small breakages, and bad decisions.

A few of my favorite commit messages are:

  • “I suck. Make submitting of reviews.”
  • “Don’t stuff the list of files in the bug list. It’s impolite.”
  • “Avoid failing out with Christian’s wacko form”
  • “Gum.”
  • “Holy apple pancakes. It worked!”
  • “I suck… The array was empty… The tests never had a chance to fail. :(“
  • “‘This is a summary’ sucks. Now we use fortune for the summary, description, and testing done. ‘You’re ugly and your mother dresses you funny.'”
  • “Unbreak things before ChipX86 notices”
  • “I’m just… garhgh”

Nowadays, our commit messages look nothing like that, but that’s the fun of a new project. You get to go commit-crazy while you try to figure out what you’re building.

Dashboard, quips and fortunes

The UI of old looked quite different than the UI of today.

We had a dashboard from the very beginning (before the review request pages, even) but it wasn’t anything like the dashboard we had today. It was a simple page with a table containing all outgoing review requests and a table containing incoming review requests. But it also had one more thing: quips.

The beginning of quips functionality was being built. Quips are just little random quotes that are inserted in the UI. I think the plan was to put quips on certain pages, making Review Board a little more fun. We were using them in the dashboard for empty lists, with variations all saying something about the dashboard being empty. Quips are a neat feature that just never survived the early days of development.

Fortunes are similar. On Linux/Unix systems, there’s a little program called “fortune” that just displays a random quote. Since we at first had to test review request functionality without actually having a repository backend of any sort, and we didn’t want to input all the information each time, we just used fortune to generate the summary, description and testing done text. This made for some really funny review requests early on, but this is of course something that had no reason to survive initial development.

Sometimes we would create a bunch of review requests just to see what kind of quotes we’d get. 🙂

Multiple repositories? Almost didn’t happen.

One of the really critical parts of Review Board today is the ability to talk to a variety of different types of repositories in one instance. But, it turns out, this almost didn’t happen.

The initial goals were not that ambitious. Review Board talked to one repository per instance. Everything was basically hard-coded with one repository in mind. That type of repository, as well as its information, was customizable. You just couldn’t have more than one. At the time, this wasn’t a problem, but it didn’t take long until we had a need to talk to two repositories.

We discussed this and at first decided that if we needed to talk to two repositories, we could just set up two instances. It would have been a lot of work to update it for multiple repositories, after all. And really, this was a small project. Who would really need more than a couple repositories? This started to nag at me, though, and so I spent a couple nights rewriting all of the code as an experiment. It ended up working pretty nicely, and we were able to ditch the multi-instance model.

The importance of rewards

It’s always nice to have a little reward for milestones. Developers sometimes compete over cool bug numbers, revisions, etc. Initially, we were going to use quips to add some fun to the site, but we ended up settling on our current trophy system.

One of our first Review Board instances started to approach review request #1000, which was a huge milestone for us. I decided to commemorate the event by staying up and quickly hacking in a hidden feature for showing a trophy for review request #1000. The way we implemented it, you’d see the first ever trophy at 1,000, and from there you’d see it at every milestone number (1,000, 2,000, 3,000, 10,000, etc.). I didn’t want to stop there, though, so I added support for a second type of trophy, one that has confused people with its appearance to this day. Mission complete.

Of course, when we updated the server and someone finally hit 1000, it triggered a bug in the new trophy code and broke his review request. Oh well, I tried.

Diff viewers are hard

If I could pick one point during the whole history of Review Board where I was ready to completely give up, it would be during the creation of our diff viewer. All three diff viewers.

See, the first diff viewer was a complete and total hack. We generated a side-by-side diff using the diff tools and just parsed the output, basically generating a table of that. It was ugly, though, and limiting. It also caused problems where text on a row would either be truncated or would break the parser. I spent a long time working on this before I totally gave up and went on to try a new approach.

My second approach was closer to what we have today, but also limiting and very, very buggy. We were using Python’s built-in diff generation module, which implements a basic diff algorithm. It gave us insert and delete information, but not replace information. We had to hack that in ourselves, and it was really a hack. Try taking a bunch of inserts and deletes and find out which of those are really changed lines. No, really, try it. It’s harder than you think, and it’ll often be wrong.

Still, we stuck with this for a long time. It was slow, buggy, and didn’t generate the sort of output people expected from diff tools. Most people see diffs from GNU Diff, which implements the Meyers Diff Algorithm (with a few additions and tweaks). These Meyers diffs are much nicer to view than what Python gave us. Another problem we hit was that we didn’t have real line number information, so we had to output fake line numbers. They weren’t really line numbers so much as row numbers in the table. Ugh. Even getting this far was really hard and frustrating, and the result still wasn’t good.

Attempt #3. I decided to build our own diff parser and generator from scratch. What a project. I knew nothing about diff generation and hardly knew where to start. I spent probably a good month or so just trying to work on this new diff code, and was so close to giving up so many times. It ended up being completely worth it, though, as we ended up with a very nice, extensible diff parser.

Without that third attempt, we’d be in the stone age. Review Board would not be as nice to use. We wouldn’t have inter-line diffs (where we highlight what changed in a replace line), syntax highlighting, move detection (coming in 1.5), or function/class headers (where we show which function/class the part of the diff is in — also coming in 1.5).

What else…

Well, there’s a lot more I could talk about. Our initial attempts at JavaScript code for the UI, our trials and challenges with database migration, or our early problems storing diffs with different encodings in databases. This is getting long, though, so I’ll cover these in another post on lessons learned.

Looking Back on Review Board Read More »

Review Board 1.0 Released!

Review Board 1.0

Tonight, we hit a milestone in the Review Board project that we’ve been working toward for over two years. We finally pushed out our 1.0 release. A lot of blood, sweat and tears went into this release (okay, so not literally, but it was A LOT OF WORK!). The last few months in particular have been challenging, as we’ve had to solve some tricky bugs and scalability problems, but the end result is pretty great.

Just a short while ago, we announced the release and put up an overview of the entire release and product. We’ve already had some nice congratulatory e-mails and tweets, which is really nice 🙂

Some stats for this release:

  • 2 years, 9 months, 25 days have passed since our first commit.
  • 120 contributors have contributed to Review Board so far (in terms of code contributions).
  • 2,019 commits were made.
  • 899 review requests have been posted to our project’s actual Review Board server. 1,650 users are registered on there.
  • Our demo server, in comparison, has 2,082 review requests filed and 10,154 users.
  • 938 bugs were filed. 812 were fixed.
  • 232 feature requests were filed. 101 were implemented. Most remaining ones are scheduled for releases.
  • An estimated 200+ companies are now using Review Board. 26 have let us list them publicly.
  • The largest known Review Board install has over 83,000 filed review requests and over 2,000 users, doing upwards of 10GB of traffic per day.
  • 5 presentations on Review Board are known to have been given, 3 by us, 2 by others.
  • 552 users have joined our main mailing list, and 3,674 e-mails have been sent.

Now that Review Board 1.0 is out, we can get started on some awesome new features we’ve had planned. I have a little notebook full of ideas for our 1.1 and 1.5 releases (which may become 1.5 and 2.0, respectively, as this list grows). Some of the new features are actually ready to be committed within the next couple of days, so those of you using nightlies will start to see them soon.

We were accepted into this year’s Summer of Code, and have three students working on exciting projects for us, so hopefully we’ll start to see these trickle into the upcoming nightlies as well. Among these projects include diff viewer improvements (moved region detection, better whitespace-only change detection), IDE integration with Eclipse, and improved notification hooks and e-mail support.

We’re also working on providing support for third-party extensions, which will allow developers to extend Review Board in new, exciting ways without having to modify Review Board itself. This is especially handy for companies who wish to integrate better with their sandboxes, bug trackers or unit testing services. This will likely land in 1.5 (2.0?) at the earliest, as it’s a large change, but the code for this mostly works today. It’s just a matter of getting the codebase ready and figuring out what APIs we want to stabilize and expose.

As I mentioned in the release announcement, we’re planning a release party, tentatively on July 11th, 2009, in the Bay Area (somewhere around Palo Alto, CA). If any Review Board users want to join us, please RSVP!

Review Board 1.0 Released! Read More »

Review Board: Summer of Code, Roadmap and Future Plans

Summer of Code

This year, we (the Review Board project) was given the opportunity to participate in Google’s Summer of Code. We’ve received some great student proposals so far, and I think we’ll see exciting work done on Review Board this summer.

The deadline for Summer of Code is coming up fast (April 3rd, 19:00 UTC). If you’re interested in working on Review Board and haven’t yet applied, it’s not too late, but you’ll want to hurry. Skim through our ideas page and, if you find something interesting or have a great idea not listed here, then apply and tell us your plans. I can say we’ve received several proposals so far for the installer and admin UI, so unless you feel strongly about either of those, you’ll increase your chances with other proposals.

We’re also offering free Review Board hosting for open source projects participating in Summer of Code. If you’re a mentoring organization and would like to give Review Board a try for reviewing and managing student code, go ahead and contact us and we’ll get you set up.

Roadmap

We’re finally nearing 1.0. We recently put out our 1.0 beta 2 release and are now in a feature freeze. We’re working to get some bug, performance and usability fixes in for beta 3, which I’m shooting for in a few weeks. Then we’ll branch for 1.0, put out a Release Candidate or two, and then finally release 1.0!

There’s a lot of really cool features planned after 1.0, namely extensions and policy customization.

Extensions

Our bug tracker is filled with feature requests for all kinds of things, ranging from bug tracker integration, instant messaging, a method for offering bribes for code reviews, and so on. We clearly can’t put all the requested features in the codebase, so we’ve decided instead to add support for third-party extensions. Coming soon, developers will be able to write extensions to Review Board in the form of Python modules to extend or alter the functionality of Review Board. The extension framework will allow them to do the following:

  • Access the database using the existing Review Board database models.
  • Add new database models for storing data.
  • Listen for signals (new review request published, review request submitted, etc.) and act on them.
  • Add custom URLs.
  • Replace existing URLs, for advanced capabilities such as replacing the diff viewer.
  • Add new API handlers.
  • Add “action” links to existing review requests and reviews.
  • Add columns and sidebar entries to the dashboard.
  • Add pages to the administration UI.
  • Communicate with other extensions.
  • Provide a settings page, which stores data in Review Board-provided models (we even auto-generate the settings page for the extension by default).
  • And more!

A lot of this already exists in a private development branch, and it will be one of our primary focuses as soon as 1.0 goes out.

In time, we’ll add a new section to the Review Board website where developers can list their extensions for download and for sale. Administrators will be able to browse and search for extensions directly from the administration UI and install them without having to even open a terminal (in most cases).

We’re hoping this will solve a lot of in-house integration issues. For example, many companies have custom sandbox architectures, bug trackers, and statistics software which they’ll now be able to tie in with Review Board.

Policy Customization

We’ve found that a lot of companies have very specific ways they want to handle policy and access restrictions. For example, many companies want to limit who can see certain parts of a repository (and therefore certain diffs), or want to allow anybody to create review groups, or want to disallow people from joining review groups. Some also want to dictate what constitutes approval for submitting a change.

We’re looking into the various requests and attempting to come up with a policy model that is flexible enough to handle these needs. One of the ideas is to provide some basic level of access control on a per-repository, per-path, and per-group basis. We’d then piggy-back on the extension framework to allow for more specific policy control. The advantage is that developers could write their own policy rules that interface with some part of their company’s infrastructure.

If people have any input on this, we’d love to hear it.

Review Board: Summer of Code, Roadmap and Future Plans Read More »

Improving browser performance in Review Board

This past Sunday, I landed a set of changes into Review Board that provide improved performance, such as aggressive browser-side caching of media and pages. It’s just a start, but has already significantly reduced page load times in all of my tests, in some case by several seconds. We implemented these methods for Review Board, but they’re methods that can be applied to any Django project out there.

There are several key things that Review Board now does to improve performance:

  • Tells browsers to cache all media for one year.
  • Only sends page data if new data is available.
  • Compresses all media files to reduce transfer time.
  • Parallelizes media downloads.
  • Loads CSS files as early as possible.
  • Loads JavaScript files as late as possible.
  • Progressively loads expensive data.

A lot of the performance improvements come straight from Yahoo!’s Best Practices for Speeding Up Your Site. We’re not doing everything there yet, but we’re working toward it. That’s a great resource, by the way, and I recommend that everyone who has even made a website before go and read it.

So what do the above techniques buy us, and how are we doing them? Let me go into more details…

Caching all media for a year

The average site has one or more CSS files, JavaScript files, and several images. This translates to a lot of requests to the server, which may leave the site feeling slow. On top of this, a browser only makes a few requests to a server at a time, in order to avoid swamping the server, which will further hinder load times. This happens every time a user visits a page on your site.

Aggressive caching makes a huge difference and can greatly reduce load times for users. Review Board now tells the browser to cache media files for a year. Once a user downloads a JavaScript or CSS file, they won’t have to download it again, meaning that in general the only requests the browser needs to make is for the page requests and AJAX requests.

The big pitfall with long-term caching is that the cached resources can go stale. For example, if a new version of an image was uploaded, the browser wouldn’t even know about it, since it was told it should keep its old version for a year before checking again.

We solve this by introducing “media serials,” timestamps that are appended to all media paths. Instead of caching /js/myscript.js, the browser would cache /js/myscript.js?1273618736.

These media serials are computed on the first page request by our djblets.util.context_processors.ajaxSerial context processor. This quickly scans all media files known to the program, finding out the latest modification timestamp. It then provides a {{MEDIA_SERIAL}} variable for templates to append to media URLs as part of the query string.

The benefit to this method is that we can cache media files for a year and not worry about users having stale cached resources the next time we upgrade a copy of Review Board. The filenames requested will be different, browsers will see that the new file is not in the cache, and make a request, caching the new file for a year.

Only send page data if new data is available

Aggressive caching of media files is great and saves a lot of time, but it doesn’t help for dynamically generated content. For this, we need a new strategy.

When a browser makes a request, it can send a If-Modified-Since header to the server containing the Last-Modified value it received the last time it downloaded that page. This is a very valuable header, and there’s some things we can do with it to save both the server and the browser a lot of trouble.

If the browser sends If-Modified-Since, and we know that no new data has been generated since the timestamp provided, we can send an HttpResponseNotModified (HTTP response code 304). This will tell the browser it already has the newest version of the page. The sooner we do this, the better, as it means we don’t have to waste time building templates or doing any expensive database queries.

Djblets, once again, provides some functions to help out here: djblets.util.http.set_last_modified and djblets.util.http.get_modified_since.

The general usage pattern is that we first build a timestamp representing the latest version of the page. This could be the timestamp for a particular object that the page represents. We then check if we can bail early by calling:

if get_modified_since(request, timestamp):
    return HttpResponseNotModified()

Further down, after building the page, we must set the Last-Modified timestamp, using the same timestamp as above, like so:

set_last_modified(response, timestamp)

We’re using this in only a few places right now, such as the review request details page, but it drastically improves load times. If the review request hasn’t changed and nobody’s commented on it since the browser last loaded the page, a reload of the page will be almost instant.

Compress all media files

Our Apache and lighttpd config files now enable compression by default. By compressing these files, we can turn a relatively large JavaScript file (such as the jquery and jquery-ui files) into a very small file before sending it over to the browser. This reduces transfer times at the expense of compression/decompression time (which is small enough to not worry for deployments of this size, and can be offset by caching of compressed files server-side).

Parallelize media downloads

It’s important to not mix loads of media files of different types. The browser parallelizes media downloads of the same type, in page load order, but if you load one CSS file, one JavaScript file, another CSS file, and then another JavaScript file, the browser will only attempt one load at a time. If you load all the CSS files before all JavaScript files, it will parallelize the CSS file download and then the JavaScript downloads. By enforcing the separation of loads, we can achieve faster page download/render times.

Load CSS files as soon as possible

Loading CSS files before the browser starts to display the page can make the page appear to load smoother. The browser will already know how things should look and will lay the page out accordingly, instead of laying the page out once and then updating that once the CSS files have loaded.

Load JavaScript files as late as possible

JavaScript loads block the browser, as the browser must parse and interpet the JavaScript before it can continue. Sometimes it’s necessary to load a JavaScript file early, but in many cases the files can be loaded late. When possible, we load JavaScript files at the very end of the document body so that they won’t even begin downloading until the page has rendered. This provides noticeable performance for script-heavy pages.

Progressively load expensive data

There are types of data that are just too expensive to load along with the rest of the page. For a long time, Review Board would parse and render fragments of a diff for display in the review request page, but that meant that before the page could load, Review Board would need to do the following:

  1. Query the list of all comments.
  2. Fetch every file commented on.
  3. Apply the stored patch to each file.
  4. Diff between the original and patched files.
  5. Render the portion of the diff commented on into the page.

This became very time-consuming, and if a server was down, the page wasn’t available until everything timed out. The solution to this was to lazily load each of these diff fragments in order.

We now display a placeholder table for each diff fragment in roughly the same size of the rendered fragment (to avoid excessive page scrolling on loads). The table contains a spinner showing that something is happening, and, one-by-one (to avoid dogpiling) we load each diff fragment.

The code to render the diff fragment, by the way, takes advantage of the If-Modified-Since header and is also cached for a year. We use an AJAX_SERIAL (same principal as the MEDIA_SERIAL above) to allow for changes in new deployments.

With these caching mechanisms in place, the review request page now loads in roughly a second in many cases (or less once cached), with diff fragments coming in lazily (and then almost immediately on future loads).

More to come…

This was a great first step, but there’s more we can do. Before we hit our 1.0 release, we’re going to batch together all our CSS files and JavaScript files into a couple of combined files and then “minify” them (basically compressing them in such a way to allow for smaller files and faster load times of the interpreted data).

Again, these are techniques we’re now making use of in Review Board, but they’re not in any way specific to Review Board. Anyone out there developing websites or web applications should seriously look into ways to improve performance. I hope this was a good starting point, but seriously, do read Yahoo!’s article as well.

Improving browser performance in Review Board Read More »

Review Board 1.0 alpha 1 released

Roughly two years ago, David Trowbridge and I began development of Review Board for use in our open source projects and our team at VMware. During that time, we’ve turned Review Board into a powerful code review tool that works with a variety of version control systems. Most of VMware has moved over to it, as have an estimated 50-100 companies world-wide. We’ve had over 100 contributors to the project, people providing volunteer support on the mailing list, and people have developed third party tools for integrating with Review Board.

After all this time in development, with this many people contributing, we decided it’s probably time to get a release out there. Sure, we could have done this a long time ago, but there’s a number of large things we were hoping to get in (a recently-committed UI rewrite, for instance). Now that we have most of the major features we want for our 1.0 release, we decided it was time for an alpha.

Over the coming months, we’ll be working on stabilizing the codebase, fixing a few large remaining usability quirks, enhancing performance, and writing some proper documentation (which is coming along nicely).

We’re eager to get a quality product out there and to begin development on the next release. There’s a lot of neat things planned:

  • Support for writing extensions to Review Board.
  • A fully-featured API covering every operation you’ll need to perform.
  • Some degree of policy support (specifying which users/groups can see which parts of a repository, for instance).
  • Reviews with statuses other than “Ship It”. This will probably be customizable to some degree.
  • Possibly some theme customization to allow Review Board to blend in better with corporate sites, Trac installs, etc.

Along with this, I plan to roll out a new website for the project that will have a browseable list of third party extensions, apps, Greasemonkey scripts, and more.

We have more information on our release on our release announcement.

Review Board 1.0 alpha 1 released Read More »

Twittering as Review Board Approaches 1.0

On the road to 1.0

We’re getting very close to feature freeze for Review Board 1.0. The last couple of major features are up for review. These consist largely of a UI rewrite that simplifies a lot of Review Board’s operations and moves us over to using jQuery. This will go in once it’s been reviewed and tested in Firefox 3, IE 6/7, Opera and Safari.

There are some preliminary screenshots up of the UI rewrite. Some things will be changing before this goes in, but it should give a good idea as to the major changes (if you’re already a Review Board user).

In the meantime, we’re working to get some other fixes and small features in, and I’m beginning work on a user manual. I’m not sure how much will get done for 1.0, but with any luck I’ll have a decent chunk done.

Twittering the night away

I’ve just set up a @reviewboard user on Twitter that I’m going to try to keep up-to-date as progress is made. This should give people a decent way of passively keeping track of updates if they’re Twitter users.

Barter system?

Britt Selvitelle of Twitter fame just sent me a great screenshot of a barter system for Review Board. Can’t get someone to review your code? Offer them something in exchange!

As some people know, we’re planning to have extensions in the next major release (1.5 or 2.0). This would be a fun little extension to have 🙂 Maybe I’ll write it as part of a tutorial.

Twittering as Review Board Approaches 1.0 Read More »

Scroll to Top